Week 07
- Feb 23
- 5 min read
Updated: Feb 24
Critique
Flower shot (sh02)
give much more movement to sim, increase movement, but also make it gentle/smooth
Work on flower texture— it looks like paper
Background— make it not be flat, render with lights, maybe add some elements
Remove stamen pieces
Don't work on frost this week
Update flower model as well
Backgrounds and color
backgrounds across all shots— no comping in backgrounds, all should be affected by scene lighting and could include other more basic elements
color of shot 1 and 5 need to be messed with a bit
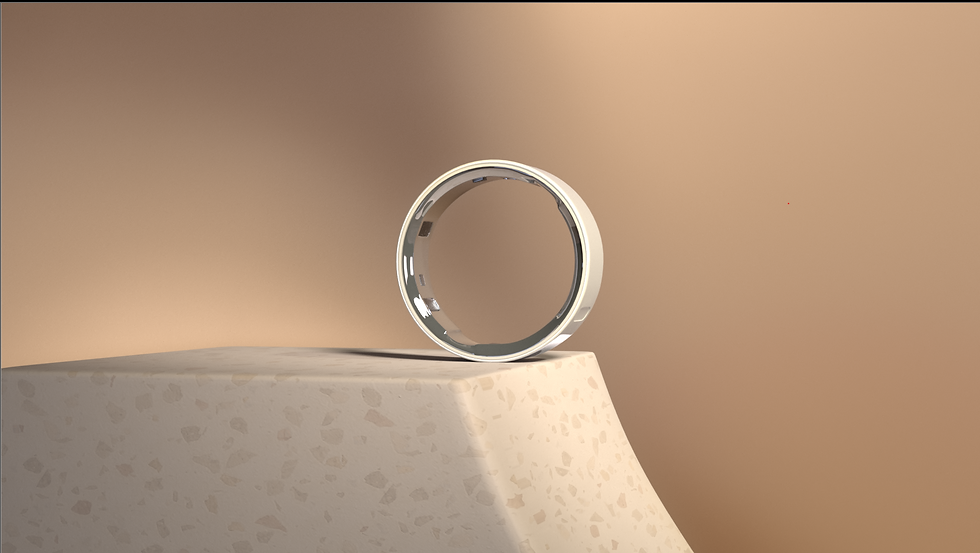
Make sure ring is brightest/stands out the most in each scene
Water shot (sh02)
emission point is missing, sky looks overcast compared to water when above
Cloth shot (sh04)
make colors a little punchier
Motion media/sound
continue working!!
Shot 2
In previous weeks there was an issue where the material AOV rebuild wouldn't rebuild properly, as there would be super slight differences. Max Jokinen and I eventually figured out that it was because of a tone map that he applied in the render, that was just being applied to the beauty pass, and not any of the AOVs. When we made the tone map also apply to the AOVs, we were still having slight differences.

render output with tone mapping applied to the beauty layer

rebuild output with tone mapping applied to each AOV individually

Our hypothesis is that this is because the tone map is applied the exact same way to each AOV as it is to the beauty, and isn't taking the whole final image in to account and adjusting for it. This likely means that when the tone map is being applied, it uses subjective variables that change with each AOV.
E.g. the tone mapping algorithm might recognize the volume values for the beauty layer to be in the mid-tone range and tone them accordingly. However when the volume is isolated to its AOV, it then breaks it up into highlight, mid-tone, and shadow, and then tones them, so the two volumes aren't toned the same, because the range is shifting each time.
So how do we fix this? Max and I were pretty stumped, and our best solution for a while was for me to just color correct the adjustment, then color correct on top of that. That gets pretty tricky though when I don't know what/how the tone mapping is applied, and definitely wasn't solving the root of the issue.
This week though, Max sat down with a whole team of Seniors to figure out how to set up the rebuild to match the beauty layer, and they figured it out! As I was using a purely additive method, the Beauty layer wasn't being used at all, and the final comp was purely the AOVs added together.
But if I subtract the AOV from the Beauty layer, apply the grading or other comp effects, then add the AOV back in, I can keep the tone mapping from the Beauty Layers all the way through to the end of the tree, while also utilizing AOVs. It makes a lot of sense looking back, and seems like the obvious method, but I hadn't even considered it! I think if I had a few more days to further research we would've figured out the solution eventually, however reaching out to others proved to be really effective, and a time saver!

Using the demo made by the seniors as a guide, I recreated the rebuild with this additive/subtractive (absolute) method. I decided to organize the tree in the way depicted below, as that way not only is it more compact, but also each row is a different type of AOV (diffuse, specular, volume) and the two columns are separated by direct and indirect. That way I can easily branch off to either side, or have a shared node in the middle (e.g. a cryptomatte).

This method means that I have to use more nodes that are linked/cloned, so that will add to the heavy-ness of the script. Since taking these screenshots, I've replaced the clones with linked grades. I've never had issues with them, however I understand there was a big scare with them destroying scripts in the past and it's typical to avoid them now— better safe than sorry!

It's important to note that this structure only works because I'm strictly using material AOVs at this point, so no AOV is subtracting the same data, allowing me to subtract two at the same time without consequence. I can add light AOVs to this setup, however in that case I need to make sure that they're not being subtracted at the same time as any material AOV, as light/material AOVs do have overlap.
We've been having a lot of trouble lighting the bookend shots and the flower shot, so I suggested it might be a good idea to render out light groups, giving me really intricate control of each shot to really fine tune everything. I reasoned that it could be a faster workflow, as we wouldn't have to wait for the viewport to update and render out for the tiny adjustments.
I could've used the layout from shot 2, however I wanted to try my hand at a relative AOV rebuild, as I wouldn't have to rebuild all the tree. This way my previous rebuild should work fine, and I then make a separate rebuild for light groups, then divide and multiply them together. Tony Lyons has a really detailed breakdown and explanation of this method in the video below, which was a huge help.


Dividing the material AOVs from the Beauty layer creates a division map, and if the light group rebuild is multiplied by that division map, the output is the material AOV rebuild, the Beauty Layer, and the light group rebuild combined.

When subtracting/adding the rebuilds (absolute), it's possible to create negative RBG values if you grade down too much, which breaks the whole rig. This is why divide/multiplying (relative) is a better and safer operation; unless a value is 0, the remainder will always be a positive number, albeit likely a small decimal.
(e.g. 1-10 = -9, which is bad for nuke, but 1/10 = 0.1, which is good for nuke).
I created the same rebuild for shot 5 as well, which was awesome because it let me push and pull the render a lot!

Shot 1 before comp
Shot 1 after comp

Shot 5 before comp

shot 5 after comp